Toilet keeps running after a flush? A safe tank checklist before replacing parts
A practical way to separate flapper leaks, chain slack, overflow problems and fill-valve faults before a small repair becomes a plumbing call.

A toilet that keeps hissing, refills for a few seconds long after a flush, or seems to “flush itself” is usually telling you that water is crossing from the tank to somewhere it should not. The good news is that many causes are visible inside the tank: a flapper that no longer seals, a chain that is too tight, a water level that reaches the overflow tube, a refill tube pushed too far down, or a fill valve that does not shut off cleanly. The safe approach is not to replace every part at once. First identify which side of the tank is misbehaving, then make the smallest reversible adjustment.
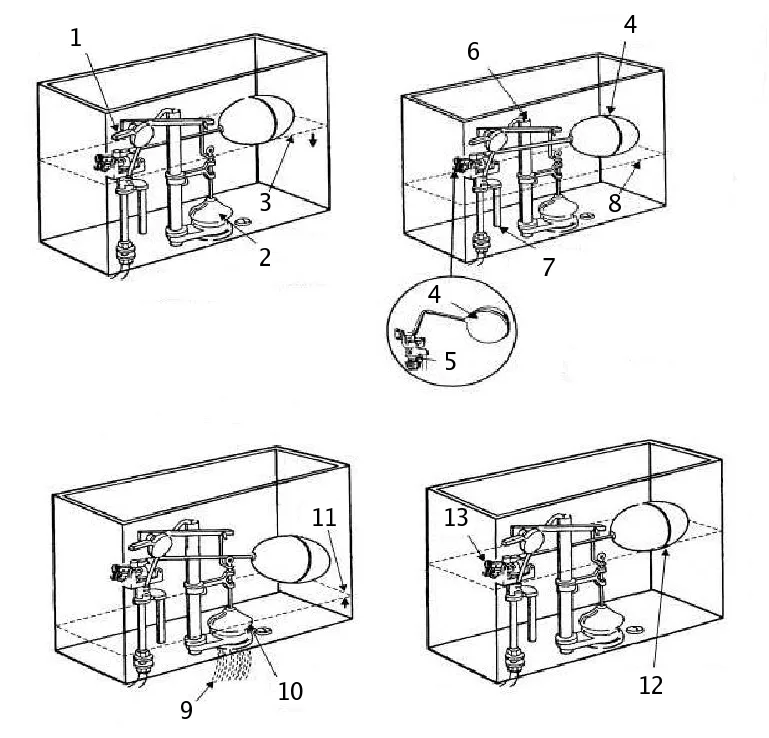
This guide stays inside the toilet tank. It does not ask you to remove the bowl, move the toilet, repair the wall shutoff, open walls, modify supply plumbing, defeat manufacturer parts, or work around code or landlord requirements. EPA WaterSense identifies worn toilet flappers and leaking valves as common household leaks; it also says average household leaks can waste more than 9,300 gallons a year and that easily corrected leaks can save about ten percent on water bills. Fluidmaster’s official troubleshooting separates the problem into two broad paths: water entering the overflow because the fill side is wrong, or water escaping past the flapper/flush-valve side. That split is the backbone of the repair.
Tools and materials
- Towel or small sponge for drips around the tank lid and your hands.
- Flashlight, because mineral buildup and chain position are easier to see with side light.
- Food coloring or a leak-detection dye tablet for a tank-to-bowl test.
- Phone camera to record the original chain hole, float setting and refill tube position before changing anything.
- Rubber gloves if the tank is dirty or has cleaning residue.
- Replacement flapper only if your test points to the flapper, matched by toilet model, size and attachment style.
- Optional adjustable wrench only for a simple, accessible supply connection and only if you already know how to shut off water without forcing the valve. If that sentence does not sound comfortable, leave wrench work to a plumber.
Safety notes before any step
- Work only in the clean tank, not in the wall, floor, supply plumbing, bowl mount or electrical equipment nearby.
- Lift the ceramic tank lid with two hands and place it flat on a towel. Tank lids crack easily and are often hard to replace.
- Do not force a corroded wall shutoff valve. A stuck or leaking shutoff is a stop-and-call condition, not a challenge.
- Do not glue, tape, weight, sand, cut or reshape tank parts. A toilet tank needs reliable movement, not improvised restraints.
- Do not put bricks or loose weights in the tank. They can break down, jam the mechanism, reduce flushing performance and hide the real fault.
- Stop immediately if you see a cracked tank or bowl, water on the floor, a rocking toilet, wet ceiling below, a kinked or corroded supply line, or any sign that the leak is outside the tank.
- In a rental, dormitory, hotel, condo with maintenance rules, or building with shared plumbing, follow the lease or building procedure even if the tank fault looks simple.
Step 1: Watch one complete flush before touching anything
Remove the lid, set it safely aside, and flush once while watching the tank from the side. Do not start by adjusting the float or buying a universal kit. Watch the handle lift the chain, the chain lift the flapper, the flapper fall back, the tank refill, and the fill valve stop. Listen for whether the hissing continues after the tank appears full. Notice whether water keeps moving into the overflow tube or whether the water level stays below the overflow while the bowl still receives a hidden trickle.
A short observation saves bad repairs. If water climbs until it spills into the overflow tube, the flapper may be innocent; the fill valve or float is allowing too much water. If the water level stays normal but the bowl later shows dyed water, the flapper or flush-valve seat is the better suspect. If the flapper never sits flat because the chain is pulling it, the repair may be a chain adjustment rather than a new valve. Take a photo now so you can undo any change.
Step 2: Mark the normal water level
Most tanks have a water-line mark molded or printed on the inside wall, or the fill valve has a recommended level. The final water level should usually sit below the top of the overflow tube, often about an inch below, but follow the toilet or valve marking when it is present. If water keeps rising into the overflow, you have found a continuous waste path: the fill valve is admitting water and the overflow is protecting the bathroom from a spill by sending the excess into the bowl.
Do not bend brittle plastic parts or guess at hidden screws. Modern fill valves usually have a clip, screw, sliding float cup or adjustment rod. Manufacturer instructions matter because mechanisms differ. Make one small adjustment, flush, and let the tank refill. If the water still reaches the overflow after a reasonable float adjustment, do not keep forcing the mechanism. The fill valve may be worn, dirty or incorrectly installed, and replacement may be appropriate if you can shut off water safely.
Step 3: Check whether the fill valve really shuts off
When the tank reaches its set level, the hissing should stop. A fill valve that chatters, keeps whispering, or restarts every few minutes can be responding to a leak elsewhere, but it can also fail on its own. Look at the overflow tube during the noise. If water is visibly running down the overflow, deal with water level and fill-valve shutoff first. If the overflow is dry yet the valve refills occasionally, suspect water leaving past the flapper or flush-valve seal.
Fluidmaster’s public troubleshooting for running toilets gives the same practical split: fill-valve/float problems when water rises into the overflow, and flapper/flush-valve problems when water leaks from tank to bowl. Some fill valves can be cleaned according to the manufacturer’s directions, but the safe sequence starts by turning off water and flushing to lower the tank level. If your shutoff is stiff, leaking, painted over, or shared with other fixtures, stop. A simple tank job becomes a plumbing job when you cannot isolate water reliably.
Step 4: Inspect the flapper without stretching it
The flapper is the rubber or plastic door at the bottom of the tank. It lifts during a flush and must settle flat on the flush-valve seat afterward. With clean hands or gloves, look for a flapper that is warped, blistered, mineral-crusted, swollen, cracked, slimy, hardened, or no longer centered. Also check whether the hinge ears are clipped properly and whether the flapper falls without rubbing the overflow tube or another part.
A worn flapper is common, but it is not the only diagnosis. EPA WaterSense specifically points to old or worn flappers as a common reason toilets leak, sometimes silently. Still, replacing a flapper blindly can fail if the real cause is a bad flush-valve seat, too-tight chain, incorrect refill tube, or fill valve overfilling the tank. If the flapper looks dirty rather than damaged, you can gently wipe the underside of the flapper and the smooth valve seat with a soft cloth. Do not sand the seat, scrape aggressively, apply sealant, or use petroleum products that can attack rubber.
Step 5: Set the chain slack, not the chain tension
The chain between handle and flapper needs a little slack when the handle is at rest. Too tight, and it holds the flapper open just enough to leak. Too loose, and the handle does not lift the flapper fully, causing weak flushes or double flushing. A good first target is a small visible sag: enough that the flapper sits completely closed, but not so much that the chain can slip under the flapper or tangle.
Move the hook by one link at a time and test. Do not shorten the chain so much that the handle feels loaded before you press it. Do not leave a long tail that can fall under the flapper; clip it only if the part instructions allow, or secure it out of the way. After the adjustment, flush several times. The flapper should rise freely, stay open long enough for the flush, and then drop cleanly without the chain pulling it sideways.
Step 6: Run a dye test before buying parts
A dye test is the simplest way to separate a visible refill problem from a hidden tank-to-bowl leak. Put several drops of food coloring or a dye tablet in the tank water. Do not flush. Wait 10 to 20 minutes, longer if the problem is intermittent. If color appears in the bowl, water is escaping from the tank to the bowl. The most likely cause is a flapper or flush-valve seal problem, although a damaged valve seat can also be involved.
If no color appears but the tank water still rises into the overflow, go back to the fill side. If no color appears and the water level does not reach the overflow, the symptom may be intermittent: repeat the test after a normal flush, after the house has been quiet for a while, or when the toilet usually refills by itself. Do not pour harsh cleaners into the tank to “test harder.” Strong chemicals can damage rubber seals and create the very leak you are trying to diagnose.
Step 7: Replace the flapper only when the evidence points there
If the dye test shows tank-to-bowl leakage and the chain is not holding the flapper open, a matched replacement flapper is a reasonable DIY repair. Turn off the water at a sound, working shutoff valve. Flush to lower the tank level. If the tank refills, the shutoff did not isolate water; stop rather than wrestling with it. Unclip the old flapper, attach the new one in the same style, reconnect the chain with modest slack, turn water back on, and test several flushes.
Matching matters. Toilets use different flapper sizes, flush volumes and attachment styles. A “universal” part that mostly fits can still leak, close too fast, or waste water. Take the old part or the toilet model number to the store, or use the manufacturer’s parts lookup. After installation, repeat the dye test. A new flapper that still leaks may be sitting on a damaged or mineral-encrusted flush-valve seat, or the chain/refill tube may still be wrong.
Step 8: Check the refill tube position
The small refill tube usually directs water from the fill valve into the overflow tube so the bowl receives its proper refill after a flush. It should be clipped so water flows into the overflow opening, not shoved deeply down the tube. A tube pushed too far into the overflow can create siphoning or odd running behavior on some setups. A tube pointed outside the overflow can spray water into the tank, make noise, or prevent proper bowl refill.
Do not improvise with tape or wire. Use the clip provided by the fill-valve manufacturer. If the clip is missing, replace the inexpensive clip or follow the valve instructions. Make sure the tube has a smooth path and does not interfere with the float, chain or flapper. Flush and watch whether the bowl refills normally and the tank stops quietly.
Step 9: Decide whether the fill valve is a DIY job for you
If the water level repeatedly climbs into the overflow even after correct float adjustment, or the valve never shuts off cleanly, the fill valve may need cleaning or replacement. For a homeowner comfortable with basic plumbing, a fill-valve replacement can be straightforward: shut water off, flush, sponge out water, disconnect the supply at the tank, replace the valve and gasket as instructed, reconnect without cross-threading, and check carefully for leaks. But that is a different level of risk than moving a chain link.
Call a plumber or maintenance service if the shutoff valve is unreliable, the supply line is corroded or kinked, the nut will not turn easily, the toilet is in a rental, you cannot identify the parts, or you are not comfortable checking for leaks after reconnecting the supply. A small leak at a tank connection can damage flooring and ceilings. No water-saving repair is worth flooding the room.
Step 10: Recheck after the tank has settled
Intermittent running often returns after everything looks fine. Put the lid back carefully, wait 15 to 30 minutes, and listen. Check again later in the day. If you used dye, repeat the dye test after several normal flushes. Look at the floor around the toilet and the shutoff valve with a flashlight. Verify that the water line stops below the overflow and that the chain is not drifting under the flapper.
Keep the old part for a day if you replaced it, but do not keep using a part that was proven to leak. Record what you changed: chain link, float adjustment, flapper model and test result. That record helps if you later call a professional, because it tells them whether the fill side, flush side or supply side has already been checked.
Do not do these shortcuts
Do not tape the handle, weigh the flapper, jam the float down, bend old plastic arms, wedge the fill valve, leave the water level above the marked line, use in-tank tablets that the toilet or part maker warns against, or ignore a running toilet because the bathroom floor is dry. A running toilet can waste water without spilling onto the floor. Also do not overtighten tank bolts or supply connections while trying to stop a sound; overtightening can crack porcelain or deform seals.
Stop and call a professional
Call a licensed plumber, qualified maintenance service, landlord-approved technician, or the water provider when the wall shutoff leaks, will not move, or must be forced; the supply line is corroded, kinked, swollen or wet; the tank or bowl is cracked; the toilet rocks; water appears at the base, wall, floor below or ceiling below; the tank overflows despite simple float adjustment; the fill valve needs replacement but you cannot safely isolate water; the flush-valve seat appears damaged; or local rules, warranty terms or rental agreements require approved maintenance.
The practical repair order is simple: observe, check overflow, check flapper, set chain slack, dye-test, clean gently, replace only the proven part, and recheck. That order avoids the two common mistakes: buying a full kit for a chain problem and replacing a flapper when the fill valve is actually sending water into the overflow.
Related articles
Sink smells bad? A safe P-trap, overflow and leak checklist before you call a plumber
A practical repair-first guide for separating a dry trap or dirty overflow from leak, vent, septic and sewer-gas problems that are not safe DIY.

The distracted dog walk: how to protect wildlife, livestock and your dog without ruining the outing
A new University of Surrey study links missed dog waste, wildlife disturbance and livestock encounters to divided attention. Here is a practical way to make walks safer, calmer and easier to manage.

The dog keeps chewing everything: safe enrichment ideas and when to call the vet
A practical owner guide to matching puzzle toys, chews and routines to the dog in front of you without missing anxiety or medical red flags.
Self-cleaning litter boxes: convenience for owners, comfort checks for cats
An automatic litter box can be useful, but only when the cat still has a safe, roomy, predictable place to eliminate.
Comments
Sign in to comment.
No comments yet.